

How To Assemble Your Ottoman Divan Bed
Now it’s time to set up your dream bed! Assembling an ottoman bed is an easy process. All you need to do is follow the instructions properly. First, take your time to attentively unpack each and familiarise yourself with all the accessories. Once these steps are complete, let’s get started.
- Click in the chrome legs into each base. These lock in with a hard tap. Note: once locked in the legs cannot be removed

-
Line up the headboard cutouts with the holes in the back of the base.
Note: Material will need piercing.
Screw in the bolts with the white washer fed into the back of the headboard. 2 bolts are provided for each side

- Push in the 2 U clips, this will secure the 2 bases together.
-
Use the plastic headed bolt to secure the lids together
Note: There is a rip in both lids to indicate where the screw will go. Also, the lids will not close if the mattress isn’t placed on top. If your bed has a footboard this can be slid on at the end once the lids are closed.

How To Assemble Your Metal Ottoman Bed
Assembling the metal ottoman style base can be a little tricky. The steps outlined below should help you through each part of the process. Ideally, we advise 2 people put this together to help support/align parts whilst the other person screws in bolts etc.
1. Assemble bedframe first. Headboard, siderails and footboard. Slot in the siderails attached to headboard and footboard. Nuts are already on the bolts. You will require a size 13 or 14 size spanner. It be ideal if you place in the black base boards along with the long black bar which goes inside the storage area. Bolts are already on the inside of the side rails

2. open up the metal slat frame and the small brown box which contains 2x small bars, 1x “U” thin bar and 10x bolts. 6X are normal and 4x are allen key bolts. The metal slat frame opens up. Place the small black bars either side of the frame with the allen key bolts. Place the “u” bar on one of the sides of the metal frame where you have placed the small black bars on the side. Note It only goes on one side on the frame.

3. fix the gaslift pistons in place - Note if the cylinders don't align then simply twist the hydraulic cylinder slowly so it aligns
4. place the metal frame on top of the frame. Note that where the “u” is thats the head side and frame only goes on one way. The remaining 6x bolts go on top of frame. 3X each side.
How To Assemble Your Slatted/Board Base Bed Frame
Assembling the slatted bed frame should take you no longer than 15 minutes. Below we have outlined detailed steps to support you from start to finish! Note all bolts are pre-attached to our bed frames.
- Unscrew all bolts attached to head and foot (Total 8 bolts)
- Click in the sides both left and right on the headboard side first, marked A,B. Tighten the bolts slightly
- Click in the sides both left and right on the footboard, marked C,D. Tighten these bolts slightly.
- Place in the support bar(s) marked E. Now tighten all bolts in all 4 corners (Total 8 bolts).
- Place the slats evenly marked F. These can be screwed in, but this is optional as some customers may want to remove to vacuum. If you have chosen base boards instead of slats then these are just to be placed on top and joined together in the middle, leaving a gap at the head and foot so you can access underneath the bed.

How To Assemble Your Divan Base Bed
Now it’s time to set up your dream bed! Assembling a divan bed is an easy process. All you need to do is follow the instructions properly. First, take your time to attentively unpack each and familiarise yourself with all the accessories. Once these steps are complete, let’s get started.
-
Fabric drawer retraining straps ensure that your drawers do not slide open during transit. They are stapled on the inside of the divan base. To remove them without damaging your divan base, please follow these instructions: -
-Cut the fabric strap across its centre to release the drawer.
-Cut the remaining fabric strap to the desired length so it is not in the way when opening and closing the drawer.

- Click in the chrome legs into each base. These lock in with a hard tap. Note: once locked in the legs cannot be removed
-
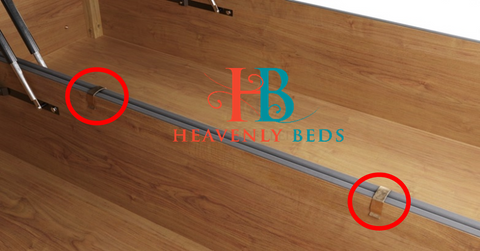
After fitting the legs, turn both parts of the divan on their side and bring them together so that the two flat ends meet.
Where the ends meet, fit the U-CLIPS so that they clamp around the underside timber piercing the mesh fabric.

-
Line up the headboard cutouts with the holes in the back of the base.
Note: Material will need piercing.
Screw in the bolts with the white washer fed into the back of the headboard. 2 bolts are provided for each side

How To Assemble Your Split Headboard
Split headboards may come in either a horizontal or vertical split depending on the type of bed purchased. We build and quality check all split headboards before packing to ensure all bolts and parts are correctly aligned. The below steps outline how to easily assemble your split headboard.
The split headboard is to be assembled fully before assembling the rest of the bed.
- Remove any packaging and place the headboard front facing the floor.
- Line up the headboard halves and screw the bolts and nuts into the predrilled holes located behind the fabric backing.
- Some split headboards come with an additional wooden support plank. Place the plank on top of the predrilled holes on the back of the headboard and screw in the bolts. If the holes don’t align flip/rotate the wooden plank and try again.
Note:
- If you purchased a wingback headboard, then the wings can be installed by standing up the headboard once the bolts are connected and screwing in the wings using the predrilled holes.